Docs / Getting Started
Getting Started#
A Commodore 64 that boots in your browser. No install, no plugins, no login. This guide takes you from a blank screen to a running game or demo in a few minutes, then points out the settings worth knowing.
Want a checklist of what the machine can do? See Features. Curious how it works inside? Start at the Architecture map.
1. Set up ROMs#
The first time you open the emulator, a "Setup C64 READY." dialog appears. The C64 cannot boot without its ROM chips. Dismiss it and the screen reads PRESS TO START SETUP; click the screen or POWER to bring it back.
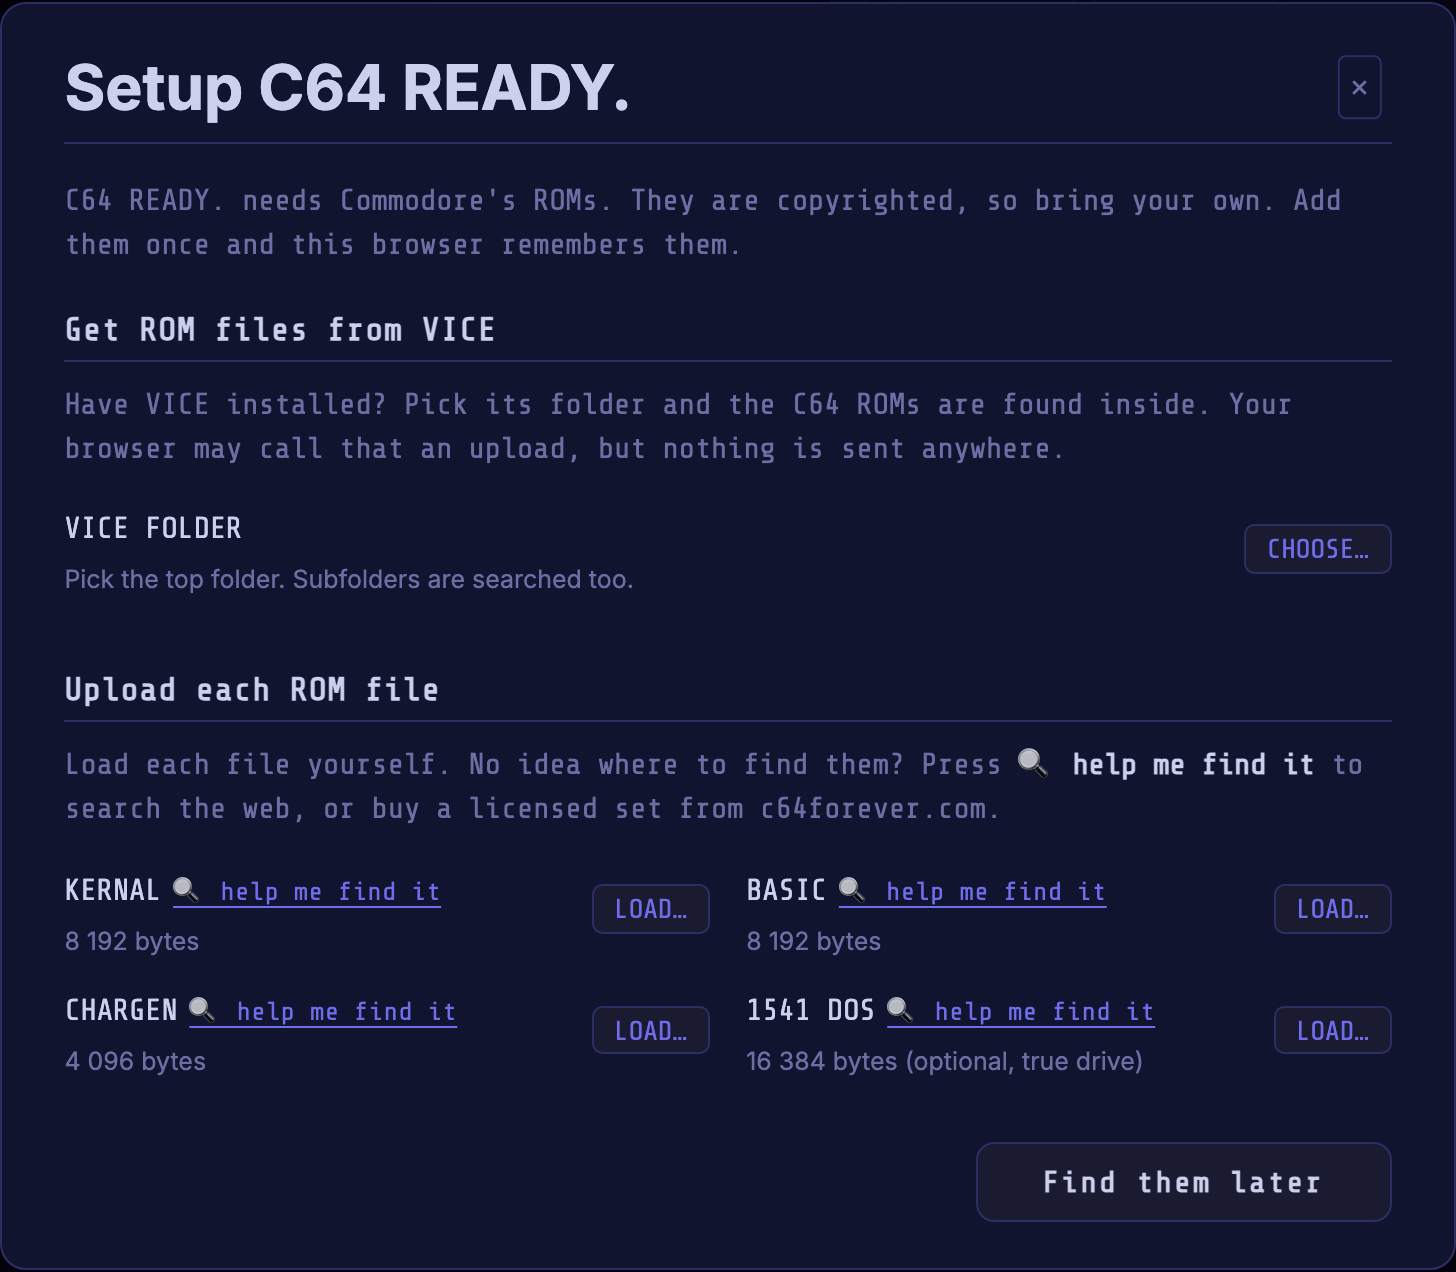
⚠️ The KERNAL, BASIC, CHARGEN and 1541 ROMs are Commodore's copyrighted property. They are not bundled, and you must obtain them legally. The app never ships, hosts or downloads them.
Have VICE installed? Press CHOOSE… and pick VICE's top folder; all four images are found inside it (your browser may call that an upload; nothing is sent anywhere). Otherwise, press LOAD… for each ROM; 🔍 help me find it searches the web for that exact filename (the emulator itself never fetches it), and a licensed set is sold at c64forever.com.
KERNAL, BASIC and CHARGEN are required; 1541 DOS is optional, for True Drive Emulation. Any compatible revision works; the search looks for:
- KERNAL:
kernal.901227-03.bin(8 KB) - BASIC:
basic.901226-01.bin(8 KB) - CHARGEN:
characters.901225-01.bin(4 KB) - 1541 DOS:
1541-II.251968-03.bin(16 KB, optional)
The button reads Done once the three required ROMs are in. This is a one-time step: they are cached in your browser, and ⚙ OPTIONS ▸ ROM Files shows and clears them. See Specifications on revisions.
2. Power on#
Press POWER. After the RAM-test pause you land on the light-blue BASIC
screen with the blinking READY. cursor. This is a real cold boot, not a
picture of one.
- POWER turns the machine on and off. Powering off tears the machine down; powering on builds a fresh one.
- ↺ RESET hard-resets the machine; more in Pause, reset, and save your place.
- Black screen, or an "Awaiting ROM files…" note? The ROMs are missing; go back to Set up ROMs.
3. Load a program#
Drag any supported file onto the screen and it goes to the right place, or use ▶ LOAD ANY on the Media load card.
| Format | What happens |
|---|---|
.prg |
Normally written onto a disk of its own in drive 8. A memory image covering $D000 to $DFFF goes straight into RAM. See Loading a .prg for autorun and the fallback without a 1541 ROM. |
.d64 .g64 |
The emulator types LOAD"*",8,1 and RUN. A .g64 holds the raw tracks of a copy-protected original and turns TDE on. See Disk drive 8. |
.nbz |
A nibbler dump. It becomes a .g64 on the way in and loads like one. |
.d71 |
A double-sided 1571 disk, served by the virtual drive. Inserting it turns TDE off for that drive; use LOAD"*",8,1 and RUN. |
.d81 |
A 1581 disk, served by the emulator itself: inserting it turns TDE off for that drive, then LOAD"*",8,1 and RUN as for a .d64. |
.crt |
The cartridge takes over at once, or on the next power-on if inserted while off. |
.tap .wav .dmp |
Becomes a tape in the Datasette: type LOAD, then press ▶ PLAY. |
.t64 |
An archive of ready programs, not a tape: the program you pick loads as a .prg would. Almost every archive holds exactly one. |
.sid |
A tune, wrapped in a player that runs on the C64. See Playing a .sid tune. |
.reu |
Fills the RAM Expansion. |
AUTORUN, on by default, starts disk loads and runs BASIC programs, including
machine-code programs with a BASIC SYS stub. A PRG loaded through drive 8
without such a stub stays at READY. for you to start. Turn AUTORUN off in
⚙ OPTIONS ▸ Media to control loading and starting yourself.
Loading a .d64 with TDE off offers to turn True Drive Emulation on when
the 1541 ROM is available. Choose Turn TDE on for disk-loader compatibility,
or Keep TDE off to continue with the current setting. A .g64 needs the
real drive, since its loader and protection live in the raw tracks, so loading
one turns TDE on without asking. D71 and D81 turn it off to use the virtual
drive. With TDE off, D64/D71/D81 support loading, saving and the command channel.
The drive card lists the disk's directory: click any program to load just that one, or press 🔍 to see the filename artwork many demos hide there.
Everything you open is remembered. 📂 LOAD LIB relaunches it with one click, and moves the whole library between browsers.
Discover demos, intros and music with Assembly64#
Use Assembly64, expanded by default at the top of the right column, to explore demos, intros, music, graphics and diskmags. Demos is selected initially. Enter a demo title or a favorite scene group in Group / producer, choose a Type and Source if needed, and press Enter or the search icon. Click LOAD D64 (or the matching format) for a single compatible file, or click the title to choose from the production's files. EXPLORE opens the full browser; REFINE SEARCH below quick results continues your search there.
Search needs a connection. Leave Save selected file to Library enabled to make the loaded file available later with LOAD LIB, including offline.
4. Type and use the keyboard#
Just start typing: your keyboard is wired straight into the C64 keyboard matrix. A few keys are remapped so the C64-only ones are reachable:
| Host key | C64 key |
|---|---|
Backspace / TAB |
INST/DEL |
F9 |
RUN/STOP |
F10 |
Commodore (⌂) key |
F11 |
CLR / HOME |
F12 |
RESTORE (RUN/STOP + RESTORE resets BASIC) |
Not sure where a symbol lives? KEY MAP shows a clickable on-screen keyboard, and the Key Map reference lists the full mapping. Need to get a BASIC listing in quickly? 📋 PASTE types your clipboard into the machine.
5. Play with a joystick, mouse, or paddle#
The C64 has two control ports. Assign each on the Control Ports card:
- Joystick: a USB or Bluetooth gamepad. Browsers only reveal a pad once it sends input, so press a button first, then pick which pad drives which port.
- Touch Joystick (phones and tablets): a stick lower left, two buttons lower right.
- Key Joystick 1 / 2: two keyboard sticks, so two people can share a keyboard. 1 is the arrow keys with J / K to fire, on Port 2 where most games expect it; 2 is WASD with C / V.
- Mouse (1351): the proportional GEOS-style mouse. Click the screen to capture the pointer; left button fires, right is up.
- Mouse (NEOS) and Paddle for software that expects them. None leaves the port empty.
SWAP PORTS exchanges the two assignments in one click.
6. Pause, reset, and save your place#
- ⏸ PAUSE freezes and mutes the machine where it is; press again to resume.
- ↺ RESET does a hard reset, the same as a power-cycle. Use it if a demo wedges.
- 💾 SAVE STATE freezes the whole machine (RAM, every chip, and whatever disk, tape or cartridge is inserted) into a named slot with a thumbnail. Pick it up later with 📂 LOAD STATE. Save is available while a program runs.
Save states live in this browser, survive reloads, and can be exported to a file and imported elsewhere, so you can hand a mid-game snapshot to someone on another machine. A save state is a permanent bookmark; PAUSE is a temporary freeze.
7. Make it look and sound right#
On the Controls card, SIZE cycles 1X / 2X / 2.5X / 3X / MAX and ⛶ FULL goes fullscreen, always keeping the C64's own proportions. VIBES opens Retro Vibes full-screen: a 3D C64 whose TV plays the live picture, with 🎬 to cycle scenes and 🥽 Enter VR if you have a headset.
In ⚙ OPTIONS:
- Display: 🖥 CRT cycles the display looks, from scanlines to a rolling mains-hum bar. ATTRACT MODE toggles the powered-off animation.
- Video: the VIC-II, 6569 (original PAL) or 8565 (later C64C), and the palette, Colodore (modern) or Pepto (2001 measurements).
- Sound: the SID, 6581 (warmer filter) or 8580 (cleaner), volume with mute, and DRIVE SOUND for 1541 motor hum and head clicks. The row below enables SID 2, selects its model and address, and chooses stereo or mono. Leave SID 2 off for a standard C64; two-SID files configure it automatically while they play.
All of these persist across reloads.
8. True 1541 drive (TDE)#
TDE is on by default: a real emulated 1541, with its own CPU and DOS, runs alongside the C64, so cracked intros, fastloaders, demos and copy-protection tricks behave like the real thing. It needs the 1541 ROM from Set up ROMs; without one the toggle stays disabled.
Off, you get the fast built-in load: instant, fine for plain games, but no SAVE and no fastloaders. The toggle is on Disk drive 8.
9. On phones and tablets#
The emulator is a Progressive Web App: choose Add to Home Screen in your browser's menu to run it like a native app, offline included.
Tap the screen to bring up the device keyboard, assign Touch Joystick on the Control Ports card to play, and turn to landscape with ⛶ FULL for the biggest picture. Switching away and back is safe: the machine pauses and mutes, then resumes where it was with no audio blip and no catch-up stutter.
Where to next#
- User Guide: the full reference for every control, card and dialog.
- Features: everything the emulator supports, from the user's side.
- Known Issues: something looks wrong? Check here first: it may be the real machine being itself.
- Architecture: how the machine is wired together, and the way into every chip's deep-dive.